By: W11-1 Since: Feb 2019 Licence: MIT
- 1. Introduction
- 2. Setting up
- 3. Design
- 4. Implementation
- 5. Documentation
- 6. Testing
- 7. Dev Ops
- Appendix A: Product scope
- Appendix B: User stories
- Appendix C: Use cases
- Appendix D: Non functional requirements
- Appendix E: Glossary
- Appendix F: Product survey
- Appendix G: Instructions for manual testing
1. Introduction
Welcome to the developer guide. This guide serves as a repository of useful information for anyone contributing to TopDeck.
To get started, proceed to Section 2, “Setting up” to set up your development environment. Section 3, “Design” provides a high-level overview of the design and architecture of TopDeck. Section 4, “Implementation” discusses specific implementation details of some features. Section 5, “Documentation”, Section 6, “Testing” and Section 7, “Dev Ops” describe the procedures involved in pushing a feature to production.
2. Setting up
2.1. Prerequisites
-
JDK
9or laterJDK 10on Windows will fail to run tests in headless mode due to a JavaFX bug. Windows developers are highly recommended to use JDK9. -
IntelliJ IDE
IntelliJ by default has Gradle and JavaFx plugins installed.
Do not disable them. If you have disabled them, go toFile>Settings>Pluginsto re-enable them.
2.2. Setting up the project in your computer
-
Fork this repo, and clone the fork to your computer
-
Open IntelliJ (if you are not in the welcome screen, click
File>Close Projectto close the existing project dialog first) -
Set up the correct JDK version for Gradle
-
Click
Configure>Project Defaults>Project Structure -
Click
New…and find the directory of the JDK
-
-
Click
Import Project -
Locate the
build.gradlefile and select it. ClickOK -
Click
Open as Project -
Click
OKto accept the default settings -
Open a console and run the command
gradlew processResources(Mac/Linux:./gradlew processResources). It should finish with theBUILD SUCCESSFULmessage.
This will generate all resources required by the application and tests. -
Open
MainWindow.javaand check for any code errors-
Due to an ongoing issue with some of the newer versions of IntelliJ, code errors may be detected even if the project can be built and run successfully
-
To resolve this, place your cursor over any of the code section highlighted in red. Press ALT+ENTER, and select
Add '--add-modules=…' to module compiler optionsfor each error
-
-
Repeat this for the test folder as well (e.g. check
HelpWindowTest.javafor code errors, and if so, resolve it the same way)
2.3. Verifying the setup
-
Run the
seedu.address.MainAppand try a few commands -
Run the tests to ensure they all pass.
2.4. Configurations to do before writing code
2.4.1. Configuring the coding style
This project follows oss-generic coding standards. IntelliJ’s default style is mostly compliant with ours but it uses a different import order from ours. To rectify,
-
Go to
File>Settings…(Windows/Linux), orIntelliJ IDEA>Preferences…(macOS) -
Select
Editor>Code Style>Java -
Click on the
Importstab to set the order-
For
Class count to use import with '*'andNames count to use static import with '*': Set to999to prevent IntelliJ from contracting the import statements -
For
Import Layout: The order isimport static all other imports,import java.*,import javax.*,import org.*,import com.*,import all other imports. Add a<blank line>between eachimport
-
Optionally, you can follow the UsingCheckstyle.adoc document to configure Intellij to check style-compliance as you write code.
2.4.2. Updating documentation to match your fork
After forking the repo, the documentation will still have the SE-EDU branding and refer to the se-edu/addressbook-level4 repo.
If you plan to develop this fork as a separate product (i.e. instead of contributing to se-edu/addressbook-level4), you should do the following:
-
Configure the site-wide documentation settings in
build.gradle, such as thesite-name, to suit your own project. -
Replace the URL in the attribute
repoURLinDeveloperGuide.adocandUserGuide.adocwith the URL of your fork.
2.4.3. Setting up CI
Set up Travis to perform Continuous Integration (CI) for your fork. See UsingTravis.adoc to learn how to set it up.
After setting up Travis, you can optionally set up coverage reporting for your team fork (see UsingCoveralls.adoc).
| Coverage reporting could be useful for a team repository that hosts the final version but it is not that useful for your personal fork. |
Optionally, you can set up AppVeyor as a second CI (see UsingAppVeyor.adoc).
| Having both Travis and AppVeyor ensures your App works on both Unix-based platforms and Windows-based platforms (Travis is Unix-based and AppVeyor is Windows-based) |
2.4.4. Getting started with coding
When you are ready to start coding, get some sense of the overall design by reading Section 3.1, “Architecture”.
3. Design
This section discusses the design of TopDeck.
3.1. Architecture

The Architecture Diagram above gives a high-level overview of the design of TopDeck. This rest of this section provides a quick overview of each component.
Main has only one class called MainApp. Its responsibilities:
-
When TopDeck launches, initialize the components in the correct sequence and connect them together.
-
When TopDeck terminates, shut down the components gracefully by invoking cleanup methods and freeing resources.
Commons is a collection of classes used generically by other components.
Notably, it contains the following class which plays an important role at the architecture level:
-
LogsCenter: Logging facility used by many classes to write to the App’s log file.
The rest of the App can be divided into the following components:
Each component
-
Defines its API in an
interfacewith the same name as the component. -
Exposes its functionality through a
{Component Name}Managerclass.
For example, the Logic component defines its API in the Logic.java interface and exposes its functionality through the LogicManager.java class.
These components interact regularly in response user commands in a typical application session.
As an example, the Sequence Diagram below illustrates what happens when a user issues the command delete 1 when they first launch TopDeck.
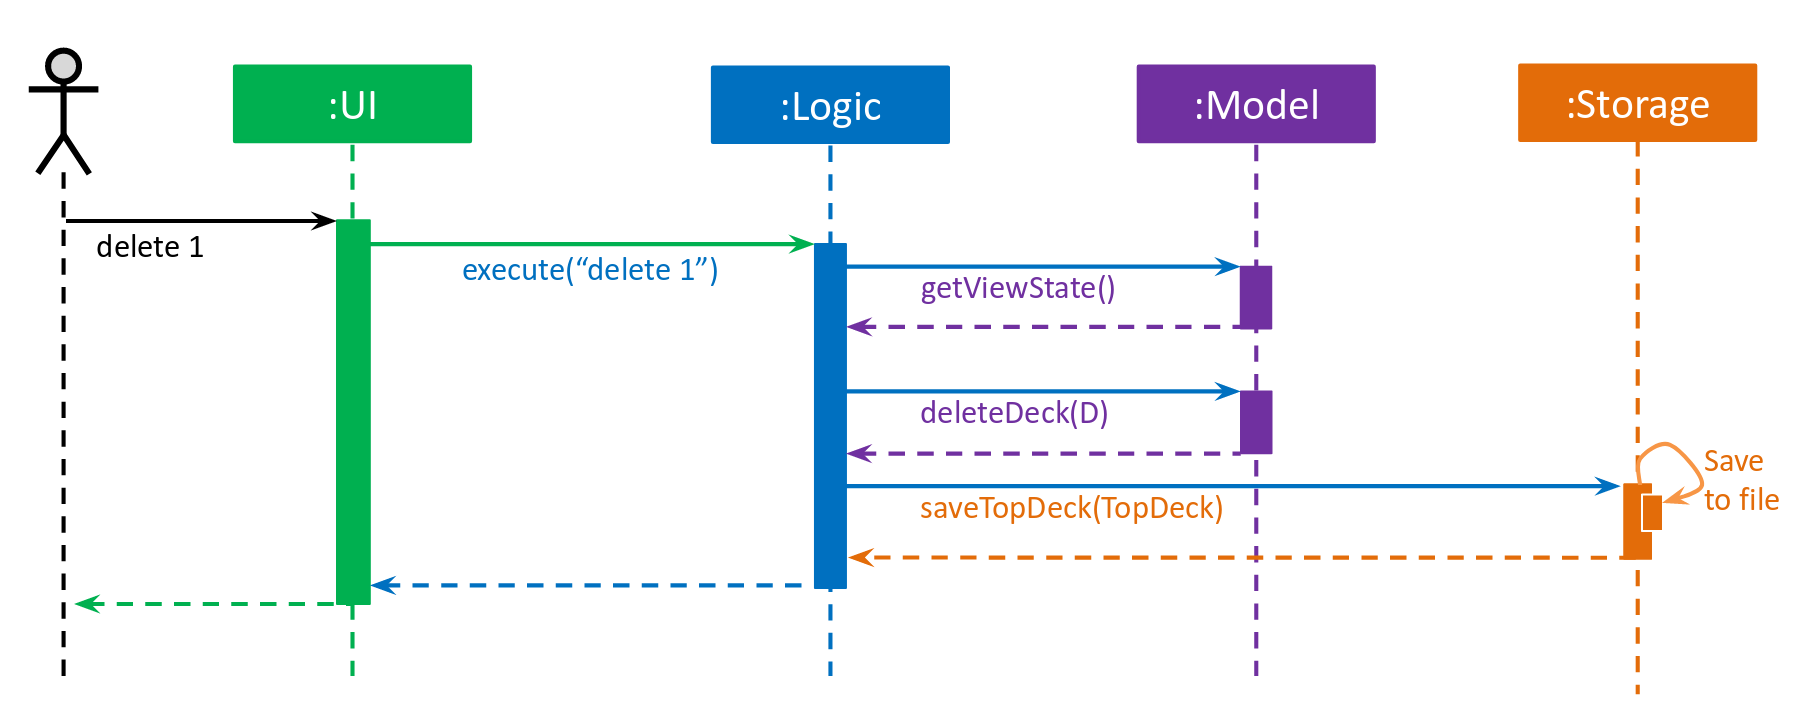
delete 1 commandThe next few sections describe the design and responsibilites of each component in greater detail.
3.2. UI component

API : Ui.java
The UI component is responsible for the user interface. It relays user commands to Logic for execution
and updates the user interface according to the application data in Model.
UI consists of a MainWindow that owns instances of the classes that make up the user interface such as CommandBox.
Notably, MainWindow owns a MainPanel which is a reference type to one of the possible main panels.
Its concrete type is dependent on ViewState from Model. The figure below shows how the user interface is divided into classes.
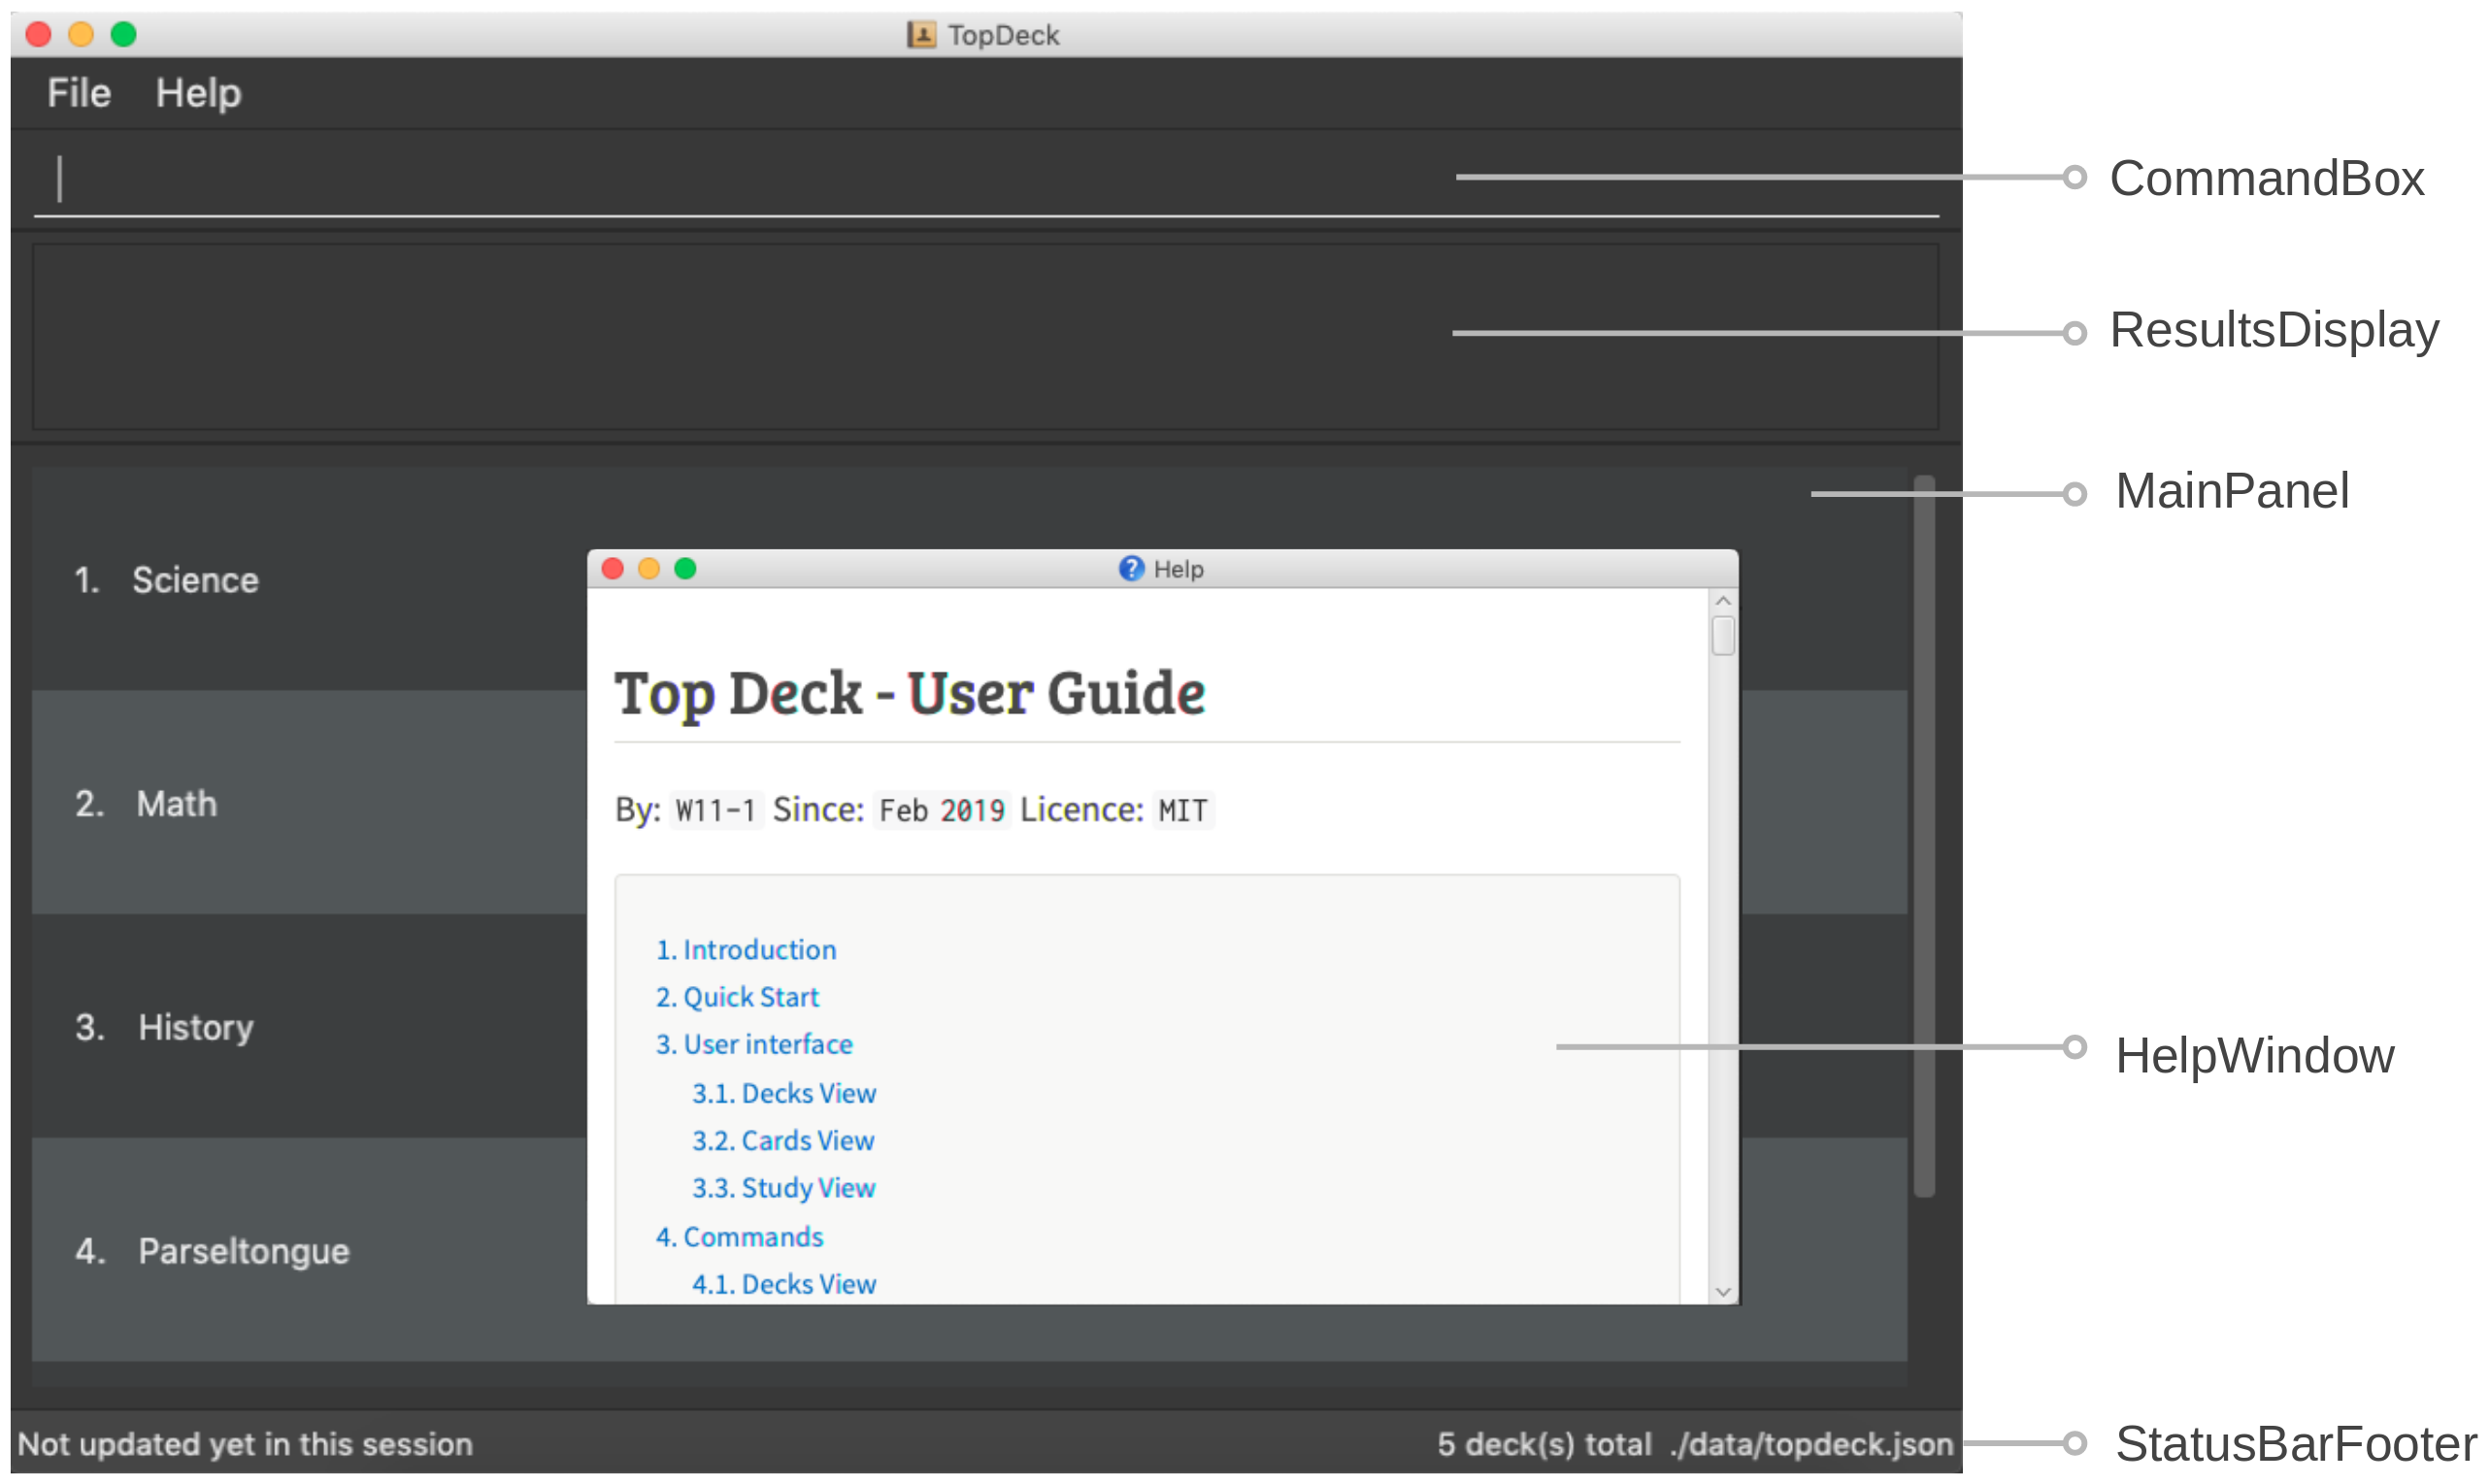
MainWindow and all its owned classes extend UiPart which is an abstract class that represents a unit that can be rendered to the display.
UI uses the JavaFx UI framework. By convention, the layout of each UIPart is defined in the corresponding .fxml file in src/main/resources/view.
For example, the layout of MainWindow is defined in MainWindow.fxml.
3.3. Logic component

API :
Logic.java
The Logic component is responsible for parsing and executing commands. A typical command is parsed and executed as follows:
-
Logicuses theTopDeckParserclass to parse the user command into a command word and its arguments. -
TopDeckParserrequests for theViewStateParserfrom the activeViewStateinModel. -
This
ViewStateParseris then used to parse the command word itself. -
This results in a
Commandobject which is executed by theLogicManager. -
The execution of this command may affect the
Model(e.g. when deleting a deck). -
The result of the command execution is wrapped in a
CommandResultobject and returned back toUi. -
Different subclasses of
CommandResultmay instructUito perform different actions, such asUpdatePanelCommandResultwhich is used to construct a newMainPanel.
To make things clearer, below is the Sequence Diagram for interactions within the Logic component given an execute("delete 1") API call.
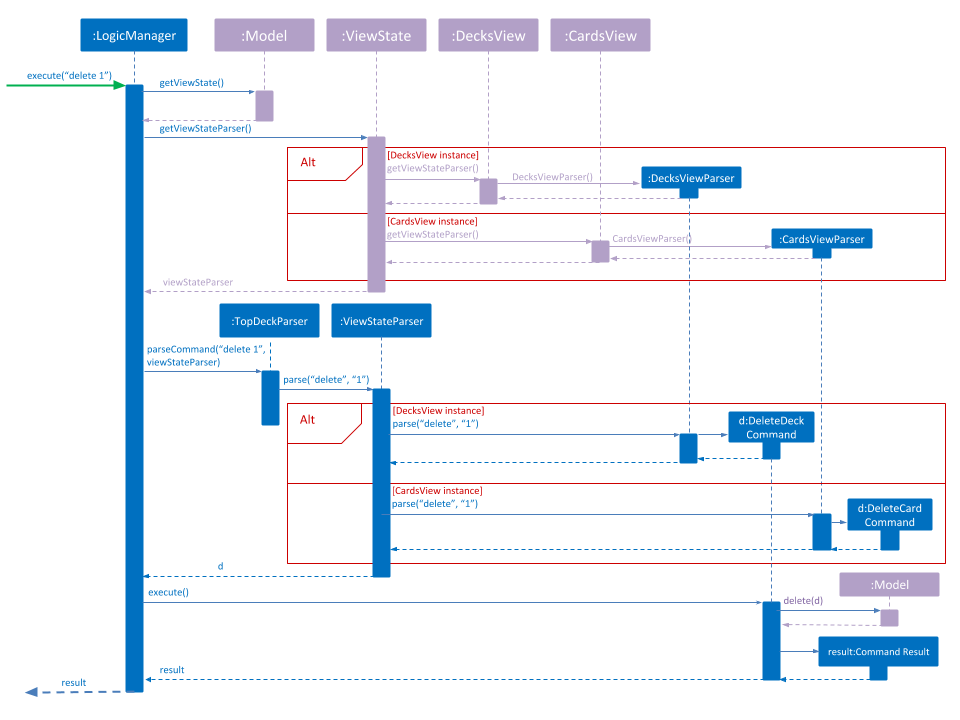
delete 13.4. Model component
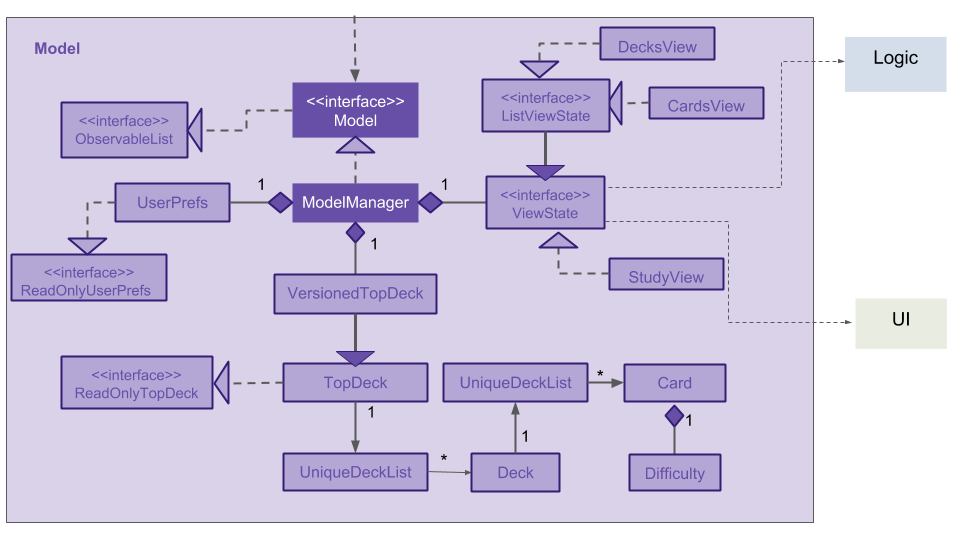
API : Model.java
The Model,
-
stores a
UserPrefobject that represents the user’s preferences. -
stores the TopDeck data.
-
stores a
ViewStateobject which represents the current state of the application. -
The
ViewStateobject can either be aDecksView,CardsVieworStudyView
3.5. Storage component

API : Storage.java
The Storage component,
-
can save
UserPrefobjects in json format and read it back. -
can save the TopDeck data in json format and read it back.
3.6. Common classes
Classes used by multiple components are in the seedu.addressbook.commons package.
4. Implementation
This section describes some noteworthy details on how certain features are implemented.
4.1. Stateful user interface
4.1.1. Introduction
TopDeck has a stateful user interface. This means that the set of valid commands and their respective functionality depend on the context of the application state.
For example, the command word add is "overloaded" with two capabilities:
-
In decks view, it adds a new deck:
add n/DECK_NAME -
In cards view, it adds a new card to a particular deck:
add q/QUESTION a/ANSWER
It is the active state in TopDeck that resolves the actual command that is called. Also, TopDeck does not request information from the user that is already implicit in the state (e.g. the target deck in the second command).
The reasons for choosing to implement a stateful user interface are manifold. Most importantly, it is necessary to support the implementation of study view which is stateful in nature. A stateful user interface is also preferable to end users since it requires less cognitive effort to operate by virtue of the fewer and shorter commands.
However, implementing state in full generality required nontrivial modifications to the AB4 architecture. These modifications have been reflected in Section 3.1, “Architecture”. We will now describe how state is implemented in TopDeck.
4.1.2. Current implementation
States partition the functionalities that are exposed to users. Hence, it is natural to consider distinct views in the user interface as separate states. States in TopDeck correspond to the three possible views described in the user guide: decks view, cards view and study view.
Each state implements a common interface ViewState
and holds transient data that is relevant only while the state is active.
For example, CardsView has a member activeDeck which holds a reference to the deck opened in decks view.
Commands in cards view such as add will then operate on this deck.
The ViewState contract also requires each implementer to provide policies
for parsing and rendering used by Logic and Ui respectively. This is an example of the strategy pattern.
ModelManager owns the sole instance of ViewState.
Having only one instance of any state makes it trivial to enforce mutual exclusion.
The Model is also responsible for executing state transitions.
Each transition is exposed as a method in the Model API.
For example, Model#changeDeck(Deck deck) implements the transition from decks view to cards view.
As state entry is handled by the constructors of each state,
the implementation of a transition is as simple as constructing a new state object.
Technically, Model#changeDeck(Deck deck) can be called from any state, not just decks view.
This is a consequence of the design of Model.
The Model API is designed such that no state tracking is necessary.
All methods are expected to work regardless of the current state.
We assume that if a caller is capable of providing the required arguments to a method,
the method call is valid and expected.
This obviates the need for state-checking code in ModelManager.
4.1.3. Design considerations
The design of the state classes was a significant technical decision. Below were my considerations.
-
Alternative 1: Keep the semantics of the original
Modeland put all state-specific fields and methods here. Maintain an enum to keep track of the active state.-
Pros:
-
Does not require much initial modifications to AB4 to support
-
-
Cons:
-
Modelwill contain a lot of irrelevant fields and methods throughout its lifetime such asgetUserAnswer(). -
Necessary to do a lot of switch-case checking, downcasting to concrete states and error handling of incorrect states.
-
-
-
Alternative 2 (current choice): Redefine the responsibilies of
Modelas above and put state-specific data and methods in the respectiveViewStateclasses-
Pros:
-
Separation of concerns. Allows different states to be developed independently.
-
Safety. It is harder to write wrong code if there are no irrelevant fields in a class.
-
Can use polymorphism to dynamically dispatch correct behaviour, obviating the need for switch-case checks.
-
-
Cons:
-
Requires substantial modifications to AB4 to support and requires a rewrite of many tests.
-
Makes testing harder since the model must be initialised to the correct state.
-
-
Despite its initial ease of adoption, alternative 1 is difficult to extend and creates significant technical debt in the long run as more state-specific functionality is added to Model.
Thus, the choice is clear. Alternative 2 is preferable.
4.2. Deck operations
4.2.1. Current implementation
Deck operations are supported in TopDeck class: A Deck consists of a list of cards. Decks are deemed as equal if they
have the same name. This is to prevent users from creating 2 or more decks with the same name.
Within the Model, Deck is encapsulated by the following data structure:
-
Model -
VersionedTopDeck -
TopDeck -
UniqueDeckList -
Deck
The Create, Read, Update and Delete(CRUD) operation will trickle down the encapsulations
and be executed in UniqueDeckList.
4.2.2. Current implementation
Deck Management is facilitated by Deck which implements the following operations:
-
add(Deck deck)
-
edit(Deck target, Deck editedDeck)
-
delete(Deck deck)
-
find(Name name)
The CRUD operations are exposed in the Model interface as Model#addDeck(Deck deck) and
Model#deleteDeck(Deck toDelete). For each deck operation,
there are 2 main updates that need to be done. The first update will be on the model
and the second will be on the ViewState.
Given below is an example usage scenario and how the addDeck(Deck) mechanism behaves at each step:
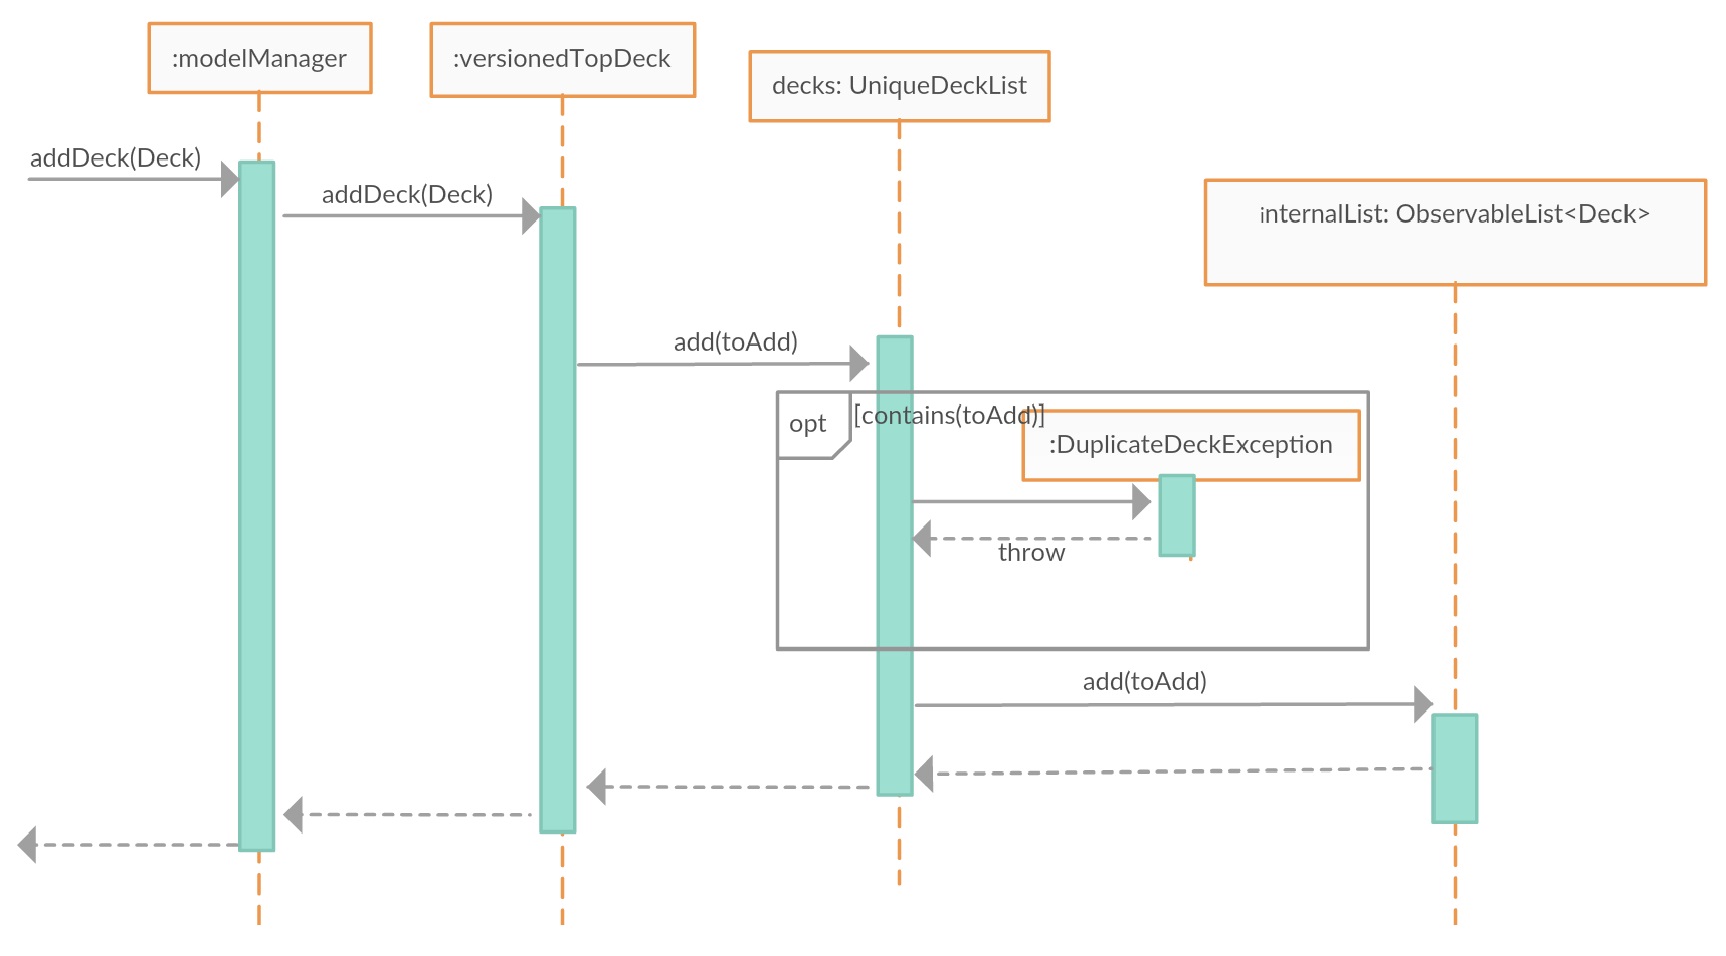
-
The user starts up the application and is in the
DecksView. The user then executes theaddcommandadd n/NAMEto create a new deck. Theaddcommand is parsed and callsModel#addDeck(Deck deck). -
Model#addDeck(Deck deck)first checks if the current state is a DecksView. Following, it will create a new deck to be added into `VersionedTopDeck.addDeck(Deck deck). -
Once that is done, the filteredItems list is being updated to reflect the change.
-
To continue to add
cards, the user will then execute the commandselect INDEX. For example, user executes theselect 1command to select the first deck. This should change theViewStatein theModelManagerfromDeckViewtoCardView. For more information oncards, refer to cards’s feature.
4.2.3. Design considerations
-
Alternative 1 (current choice): Implement the logic of deck operations in TopDeck class.
-
Pros: Easy to implement and debug as all logic related with executing commands are implemented in TopDeck.
-
Cons: Card class is not informed, or notified when its UniqueDeckList is modified. This might result in unexpected behaviors if a deck command is executed and the person in charge of Card class assumes that the UniqueDeckList is unmodified.
-
-
Alternative 2: Implement the logic of card-level operations in Deck class.
-
Pros: The responsibility of each class is clear, only a Deck can modify its list of cards.
-
Cons: The logic for executing deck-level and card-level commands are implemented at different places. We must ensure that the implementation of each command is correct.
-
-
Why Alternative 1: Without changing the current Undo/Redo feature makes it difficult to implement as we have decided to go with a stateful implementation. However being stateful allows for more features like our study mode in the future. The following design considerations for card management will better illustrate why we decided to go with this approach.
4.3. Card management
4.3.1. Data structure
A Card consists of a question, an answer, its difficulty and the respective tags associated with it. Card’s are deemed as equal if they have the same question to prevent the user from creating same question twice or to have 2 different answer for the same question.
In order to facilitate the CRUD operations, CardsView contains activeDeck which is a reference to the
current deck that we are modifying.
Before any Card related operation can be executed, ViewState in ModelManager has to be of type CardsView.
For more information refer to the section on ViewState management.
|
4.3.2. Current implementation
Card management is currently facilitated by Model which implements the following operations:
-
hasCard(Card card, Deck deck)
-
addCard(Card card, Deck deck)
-
removeCard(Card target, Deck deck)
-
editCard(Card newCard, Deck deck)
The CRUD operations are exposed in the Model interface as Model#addCard(Card card, Deck deck),
Model#deleteCard(Card target, Deck deck) and Model#setCard(Card target, Card newCard, Deck deck).
For each operation, there are 2 objects that need to be updated namely, VersionedTopDeck and CardsView.
Each CRUD operation called by `ModelManager`can be broken down into the following steps:

Here is a code snippet for VersionedTopDeck#addCard(Card newCard, Deck deck) which shows the sequence
of functions carried out and returns the newly edited deck to ModelManager:
public Deck addCard(Card card, Deck activeDeck) throws DuplicateCardException, DeckNotFoundException {
        requireAllNonNull(card, activeDeck);
        if (!decks.contains(activeDeck)) {
            throw new DeckNotFoundException();
        }
        if (activeDeck.hasCard(card)) {
            throw new DuplicateCardException();
        }
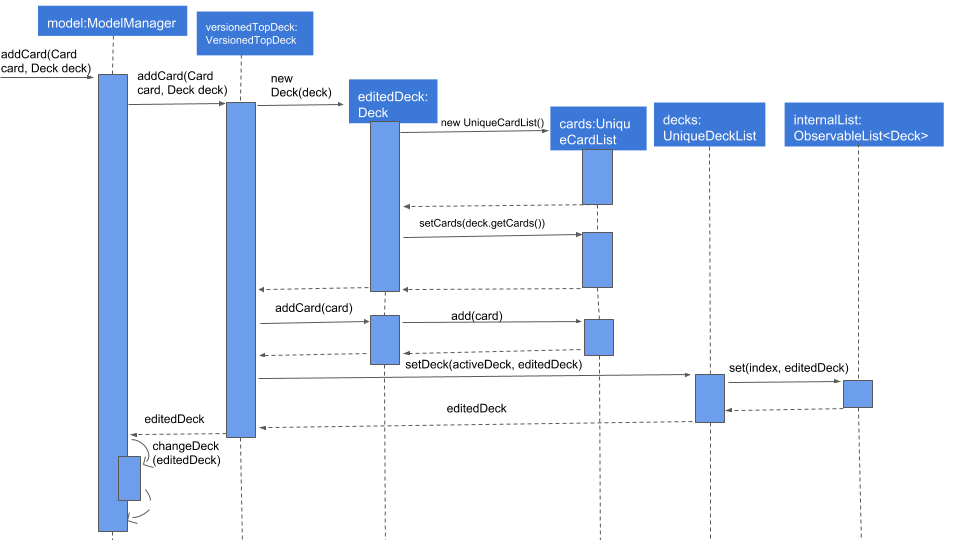
        Deck editedDeck = new Deck(activeDeck);
        editedDeck.addCard(card);
        decks.setDeck(activeDeck, editedDeck);
        .
        .
        .
        return editedDeck;
}
All other CRUD operations works similarly. Instead of VersionedTopDeck.addCard(Card card, Deck activeDeck),
VersionedTopDeck.deleteCard(Card target, Deck activeDeck) or
VersionedTopDeck.setCard(Card target, Card newCard, Deck activeDeck) is called.
|
Given below is an example usage scenario of how the add operation works and how it interacts with Undo/Redo:
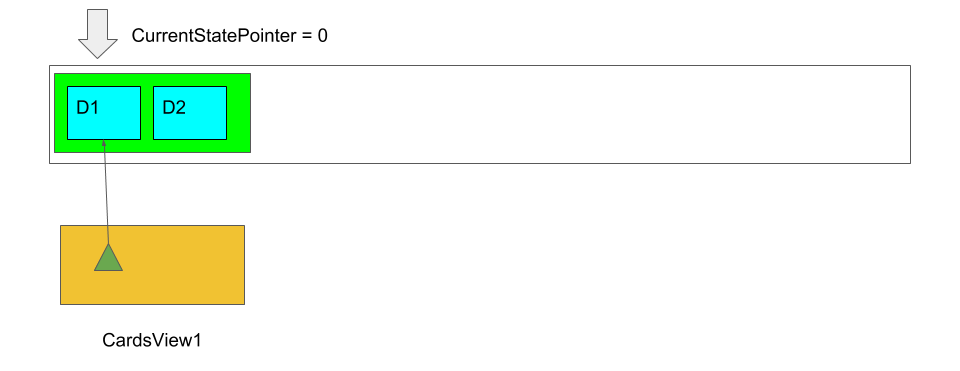
Step 1. The user starts up the application and is in the DecksView. The user then
executes the open 1 command to open the first deck(D1 in the figure). This should change the
ViewState in the ModelManager from DeckView to CardsView and causes
CardsView.activeDeck to point to the first deck as per figure 4.3.2. For more information, refer to
the Deck feature.
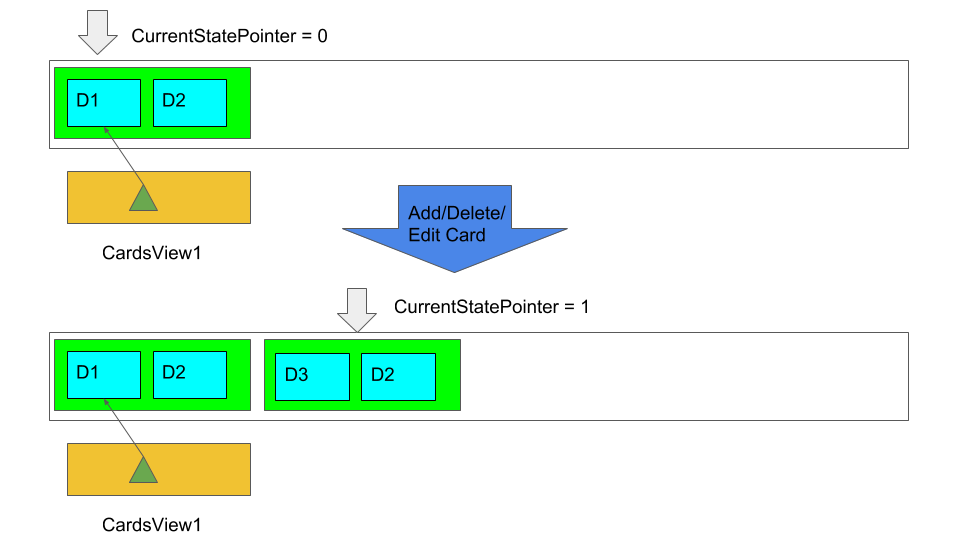
Step 2. The user executes add q/question a/answer to add the new card into the current deck.
The add command is parsed and calls Model#addCard(Card card, Deck deck).
VersionedTopDeck(Card newCard, Deck deck) is then called. D3 which is a copy
of D1 is created and the new card is added to D3. VersionedTopDeck is then updated
as per figure 4.3.3 by calling UniqueDeckList.setDeck(Deck target, Deck editedDeck).
Step 3. Next, the CardsView is updated creating a new CardsView that points to D3
as in figure 4.3.4
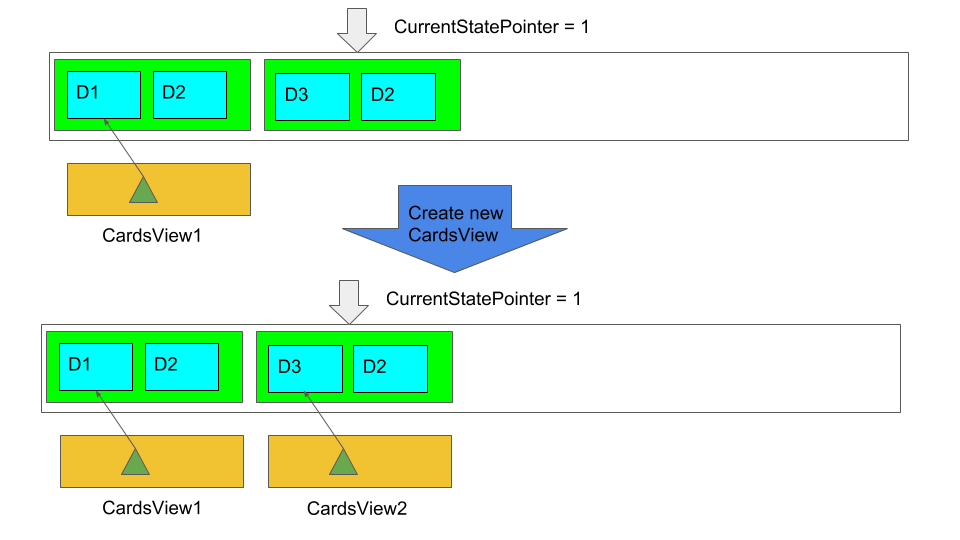
Step 4. Once that is done, the ModelManager.filteredItems list and the UI is being updated to
reflect the change.
Step 5. Now the user executes undo. This results in the CurrentStatePointer to point
to the previous TopDeck as per figure 4.3.5
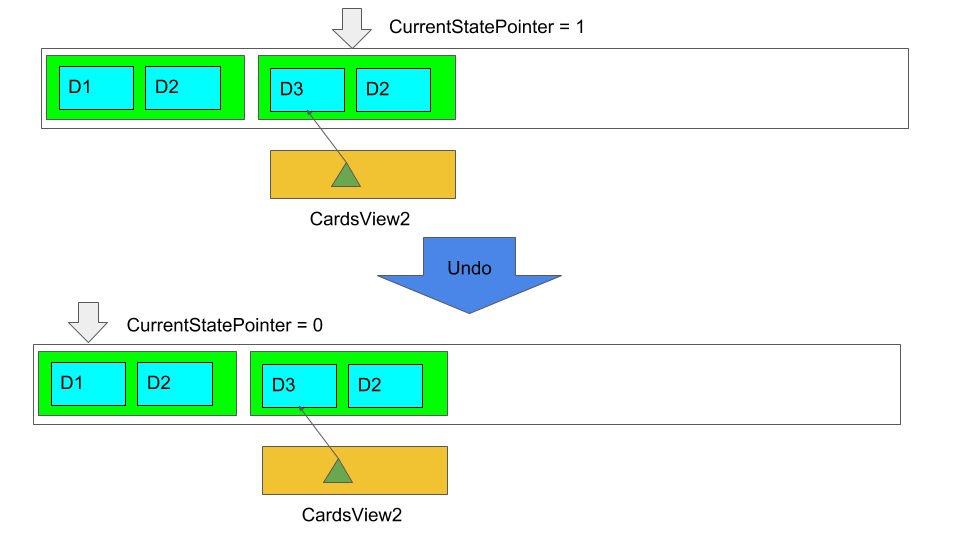
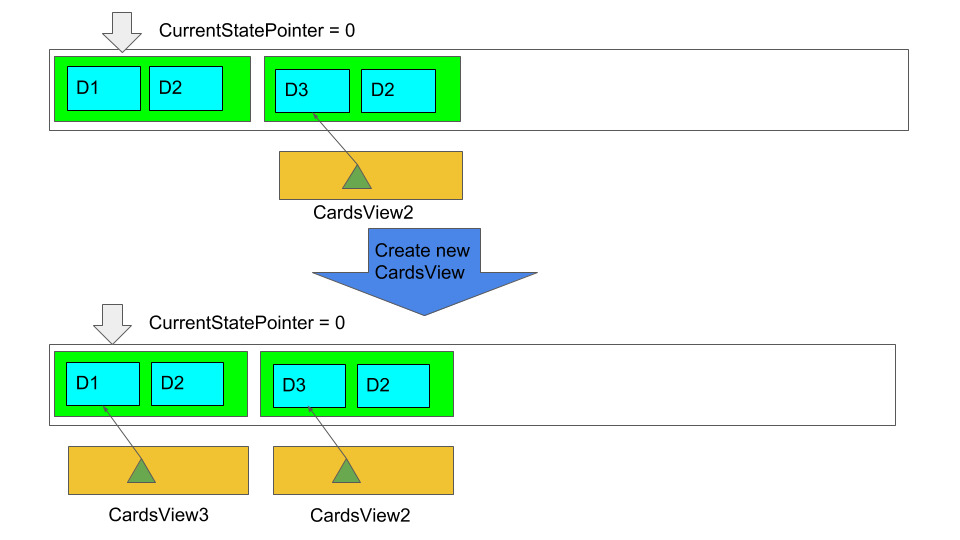
Step 6. Using D3, the application will get D1 in TopDeck that is pointed to by CurrentStatePointer.
A new CardsView(CardsView3) is then created and points to D1 as per figure 4.3.6. The application
then updates ModelManager.filteredItems and the UI is being updated.
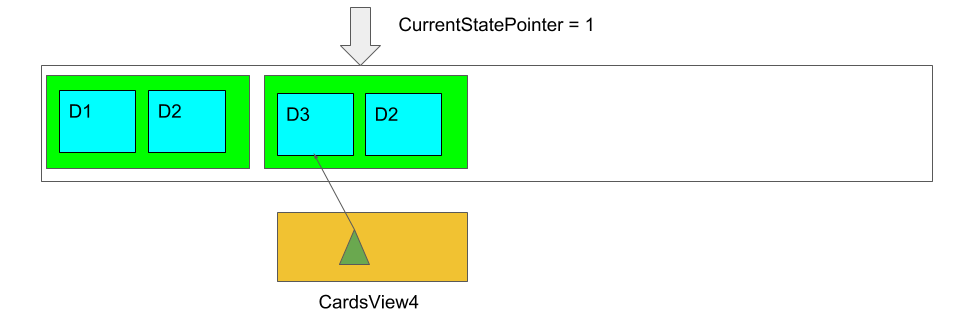
Step 7. Now, the user executes redo. This results in the the CurrentStatePointer to point to the next TopDeck as per figure 4.3.7
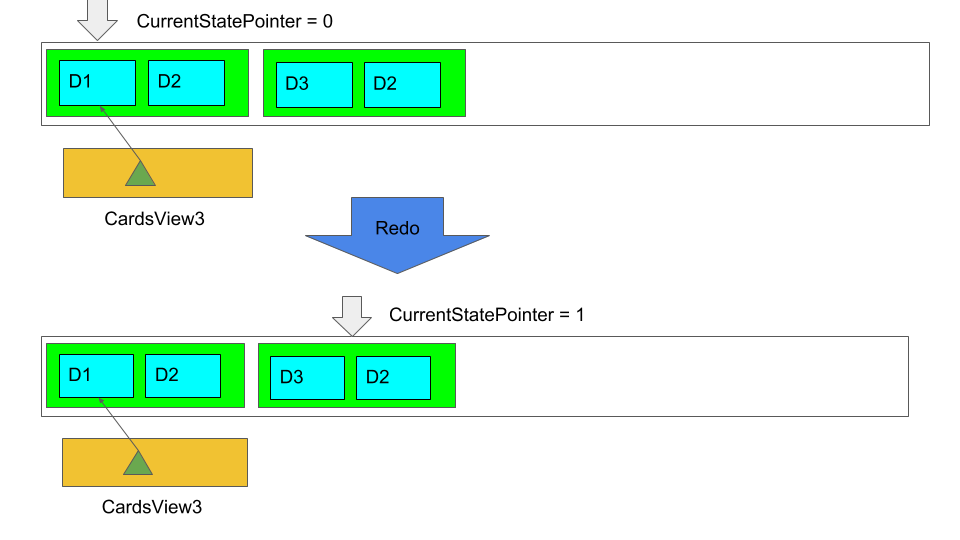
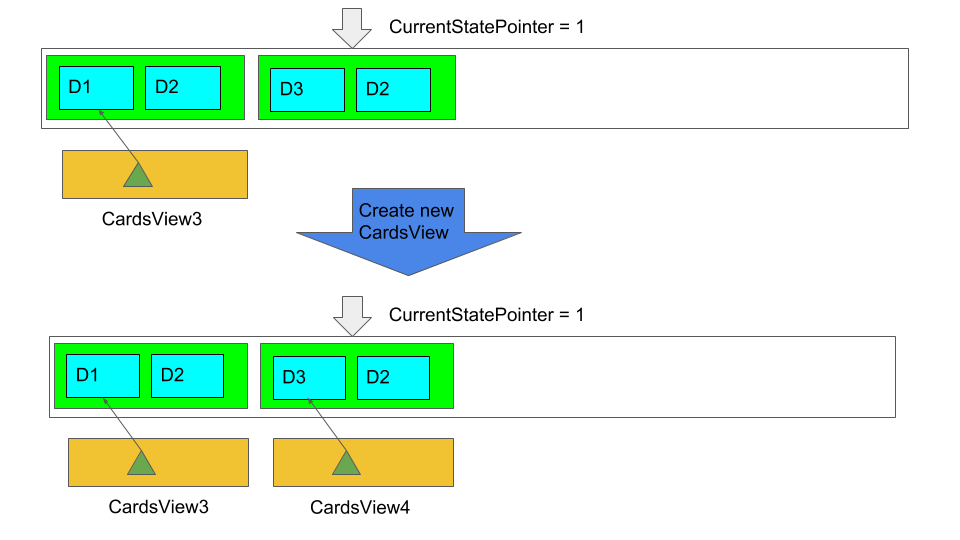
Step 8. Using D1, the application will get D3 in TopDeck that is pointed to by CurrentStatePointer.
A new CardsView(CardsView4) is then created and points to D3 as per figure 4.3.8. The application
then updates ModelManager.filteredItems and the UI is being updated.
Step 9. Below is the final state of ModelManager:
Below is a sequence diagram to illustrate the sequence of activities upon calling
Model#addCard(Card card, Deck deck):
4.3.3. Design considerations
Aspect: Data structure of cards
-
Alternative 1(current choice): Have a list of cards within each deck
-
Pros: Allows for decks features such as import and export. Also, any search operation is done within the deck only.
-
Cons: There is a need to implement an extra
Deckdata structure and makes the model more complicated.
-
-
Alternative 2(current choice): Have a global list of cards with tags.
-
Pros: Updating of UI will be easier as there is one global list only.
-
Cons: In order to study the cards, the application has to search through the global list to find the cards with the tags that we want to study. Organisation of cards will also be messy as the only form of organisation for cards is through tagging.
-
-
Reason for choice 1: Choice one was chosen as it would allow the user an extra layer of organisation(
DeckandTag) when managing cards.
Aspect: How CRUD operation should work
-
Alternative 1 (current choice): Recreate the CardViews after each operation
-
Pros: Leverages on the current implementation of
VersionTopDeckmaking it easier to implement. -
Cons: There is a memory and operation overhead as a new
CardsViewis constantly being created. Also, there is a need to refresh the UI at every update as the UI needs to render the newCardsView.
-
-
Alternative 2: Alter the card list in
CardsViewand the model upon each operation-
Pros: Only has to update the active Deck in CardsView and the model
-
Cons: As
CardsView.activeDeckcan only reference to one deck only, the current Undo/Redo feature will have to be re-implemented to store the previous commands and the object changed.
-
-
Reason for choice 1: Choice one was chosen in order to retain the Undo/Redo function and to leverage on the original architecture instead of changing it.
4.4. Study view
4.4.1. Stateful implementation
The purpose of a study session is to let users test their knowledge of flash cards. This is done by randomly generating a card to be shown to users, presenting them with questions followed by answers in an alternating manner.
In order to facilitate the alternation between two states, the StudyView class holds two main variables:
-
currentCard- the card which is currently being shown to the user. -
currentStudyState- an enum which can be either beQUESTIONorANSWER
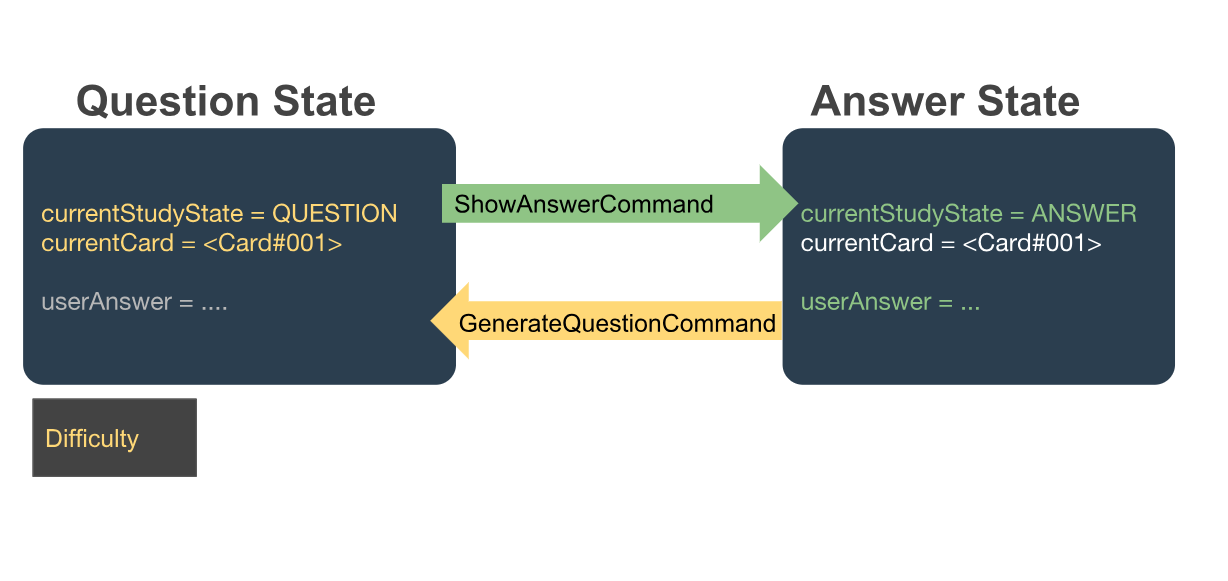
These two variables are continuously being altered to change the view every time the user interacts with the program.
The user can execute two types of commands to toggle value of currentStudyState. These are
ShowAnswerCommand and GenerateQuestionCommand.
Unlike other commands, the type of command executed is
inferred on the basis of currentStudyState instead of the command word.
Upon command execution, currentStudyState is evaluated and is toggled to
the opposite state. This behaviour is summarised below.

Besides toggling state, both commands also call
other functions to fully support StudyView functionality as detailed below.
4.4.2. ShowAnswerCommand
This command is executed when users types in anything to the CommandBox during question state.
This string typed is the user’s attempt for the question shown. ShowAnswerCommand has to store this string internally
for later display. This is done by setting userAnswer variable in StudyView class.
Given below is an example usage scenario and how the ShowAnswer mechanism behaves at each step.

Step 1. User attempts the question by typing in any command. If in question state and the command is not a preset command,
a ShowAnswerCommand object containing userAnswer is returned.
Step 2. When command is executed, the user’s answer is stored internally in userAnswer
variable of StudyView through the setUserAnswer() function.
Step 3. currentStudyState in StudyView is toggled to ANSWER.
Step 4. UI automatically changes to show answer as shown UI section.
4.4.3. GenerateQuestionCommand
This command is executed when users types into the CommandBox during answer state.
The string typed is his rating for the flash card shown.
Thus, GenerateQuestionCommand needs to modify
average difficulty rating inside Card object.
Besides that, it needs to modify currentCard to show a new card as well.
Given below is an example usage scenario and how the ShowAnswer mechanism behaves at each step.
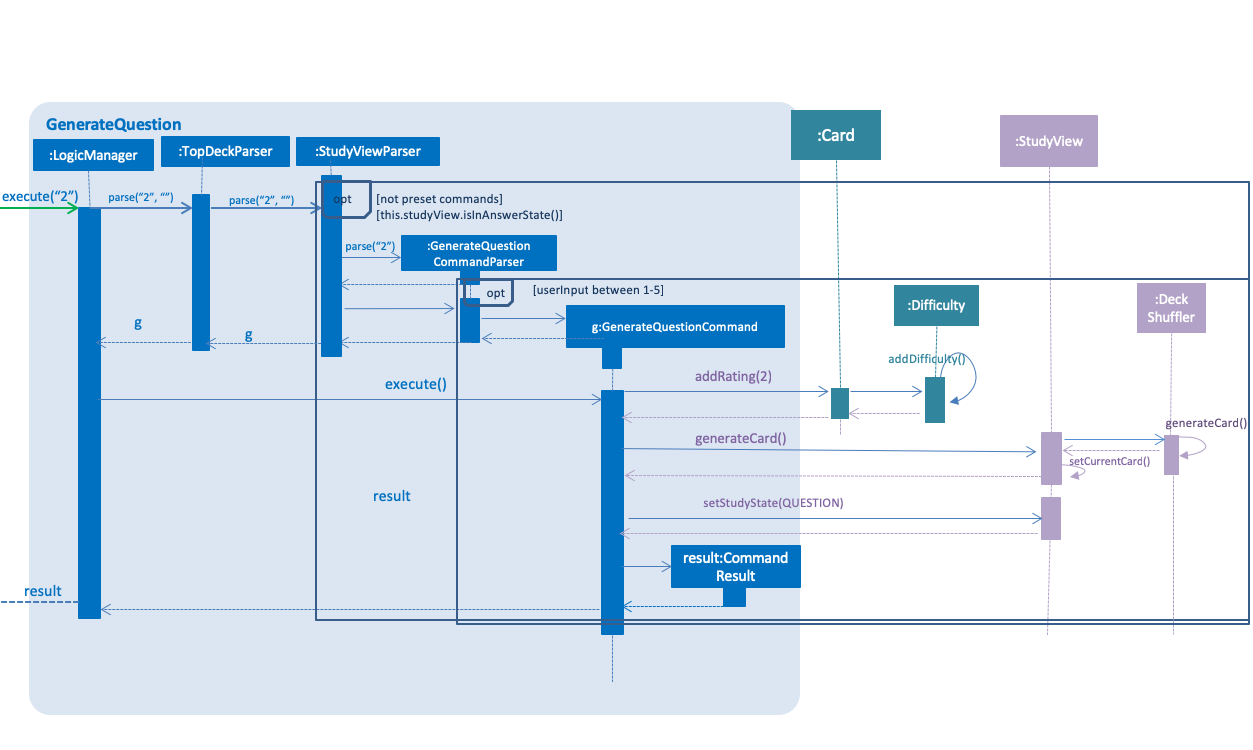
Step 1. User enters a rating. If in answer state, and command is not a preset command,
and rating is between 1-5, a GenerateQuestionCommand object containing int rating is returned.
Step 2. When command is executed, addRating() is called to modify the difficulty of the
currentCard. This calls addDifficulty() in Difficulty class which is
a property of Card class. Implementation detailes are found in Difficulty Section.
Step 3. generateCard() in StudyView is called. StudyView calls its DeckShuffler to generate a card as detailed in
DeckShuffler section. Card returned by DeckShuffler is passed back to StudyView and studyView uses this to reset its own currentCard
through setCurrentCard() function.
Step 4. currentStudyState in StudyView is toggled to QUESTION.
Step 5. UI automatically changes to show question as shown in UI section.
Summary of Changes
The summary of variable changes to StudyState after running these commands is detailed below.
4.4.4. UI implementation
StudyView makes use of ReadOnlyProperty wrapper
to store variables which the UI has to display. This wrapper is chosen as it implements the Observable interface.
The UI listens out for three things: the studyState, userAnswer, and textShown.

The following details the changes to these observable variables.
| observableProperty variable | How this variable is modified | Changes in UI |
|---|---|---|
|
Explained in Study User Commands |
|
textShown |
Calling |
|
userAnswer |
Explained in Show Answer Command |
|
4.4.5. DeckShuffler brief overview
In order to generate a random Card object reference, DeckShuffler holds 3 variables:
-
activeDeck- deck that it needs to choose cards from -
shuffledDeck- list of cards inactiveDeckthat has been shuffled byCollections.shuffle() -
it- aCarditerator that loops through cards inshuffledDeck.
When generateCard() is called, iterator calls next and returns Card referenced. If none, shuffledDeck is shuffled again and
iterator is set to shuffledDeck.begin().
4.4.6. Difficulty class overview
The Difficulty object, a property of Card, has two variables:
-
totalRating -
numberOfAttempts
When addDifficulty(int rating) is called, rating is added to totalRating and noOfAttempts
is incremented by 1. Other views can obtain average by obtaining quotient of the two variables above.
4.4.7. Design considerations
Aspect: How to store states
-
Alternative 1 (current choice): Using enums
-
Pros: Easy to implement. Makes sense as
QuestionStateandAnswerStatedo not have intrinsic properties, besides the UI looks associated with each state. -
Cons: Unused variables in
StudyView, such asuserAnswervariable.
-
-
Alternative 2: polymorphism using
QuestionStateandAnswerStateclassess-
Pros: Less unused variables. More organised.
-
Cons: Requires larger structural changes.
-
I chose the first implementation as the problem of unused variables is minimal.
I do not foresee major changes to the way QUESTION and ANSWER works in future.
There are not many possible reasons to store extra variables associated only with either state.
Aspect: How to implement UI modifications
-
Alternative 1 (current choice): Observable Properties
-
Pros: UI changes automatically. Concerns are separated as no additional command is needed to manually update UI during internal state change.
-
Cons: Less control over UI changes.
-
-
Alternative 2: Manual Modification of UI
-
Pros: Greater control over items to send to UI
-
Cons:
StudyViewwill have to concern itself with UI arrangements
-
I chose the first implementation as UI changes happen all the time but the UI is highly similar in both states. Thus, a few Observable variables should suffice to achieve the desired variation between states.
4.5. Undo/redo feature
4.5.1. Current implementation
The undo/redo mechanism is facilitated by VersionedTopDeck.
It extends TopDeck with an undo/redo history, stored internally as an TopDeckStateList and currentStatePointer.
Additionally, it implements the following operations:
-
VersionedTopDeck#commit()— Saves the current TopDeck state in its history. -
VersionedTopDeck#undo()— Restores the previous TopDeck state from its history. -
VersionedTopDeck#redo()— Restores a previously undone TopDeck state from its history.
These operations are exposed in the Model interface as Model#commitTopDeck(), Model#undoTopDeck() and Model#redoTopDeck() respectively.
Given below is an example usage scenario and how the undo/redo mechanism behaves at each step.
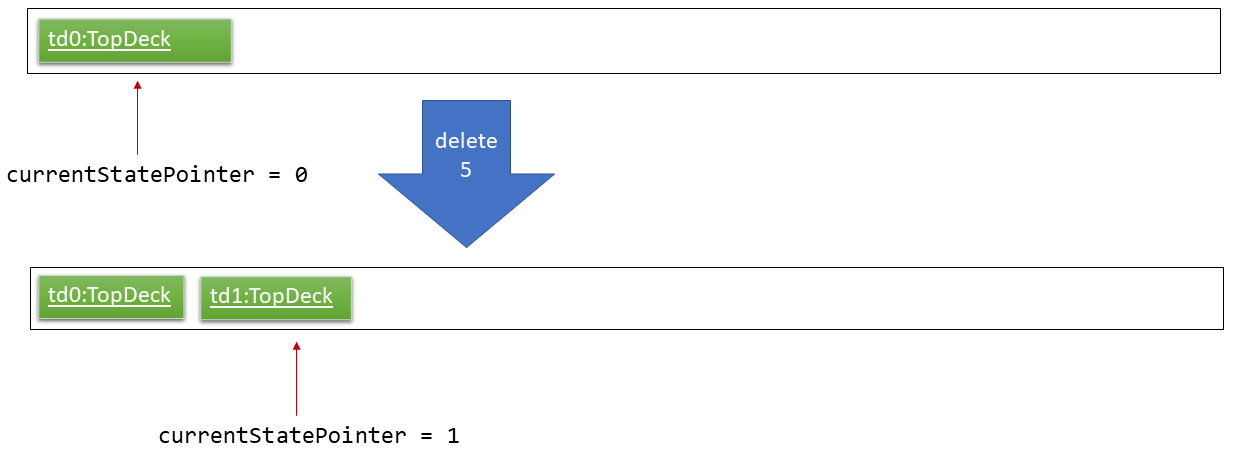
Step 1. The user launches the application for the first time. The VersionedTopDeck will be initialized with the initial TopDeck state, and the currentStatePointer pointing to that single TopDeck state.

Step 2. The user executes delete 5 command to delete the 5th deck in TopDeck. The delete command calls
Model#commitTopDeck(), causing the modified state of TopDeck after the delete 5 command executes to be saved in the topDeckStateList, and the currentStatePointer is shifted to the newly inserted TopDeck state.
Step 3. The user executes add n/History … to add a new deck. The add command also calls Model#commitTopDeck(),
causing another modified TopDeck state to be saved into the topDeckStateList.
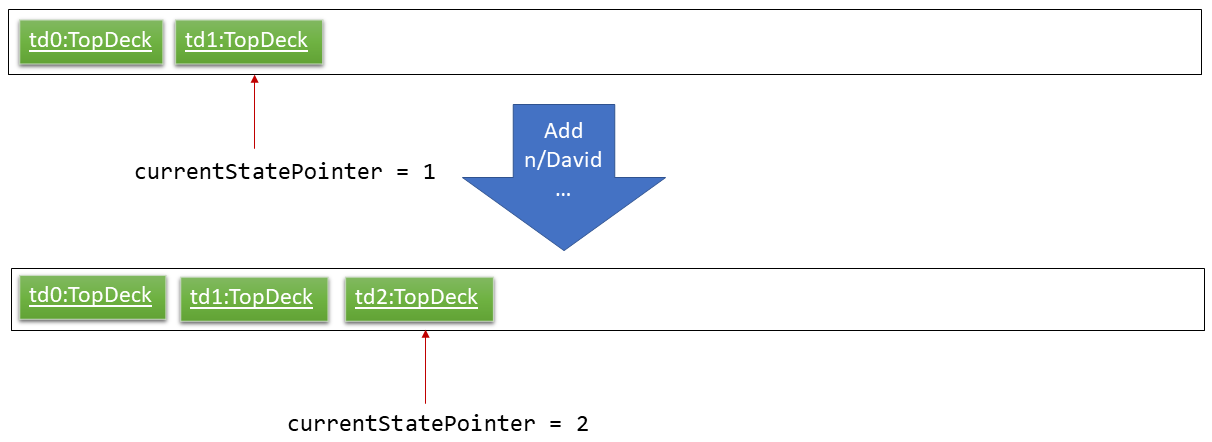
If a command fails its execution, it will not call Model#commitTopDeck(), so the TopDeck state will not be saved into the topDeckStateList.
|
Step 4. The user now decides that adding the deck was a mistake, and decides to undo that action by executing the undo
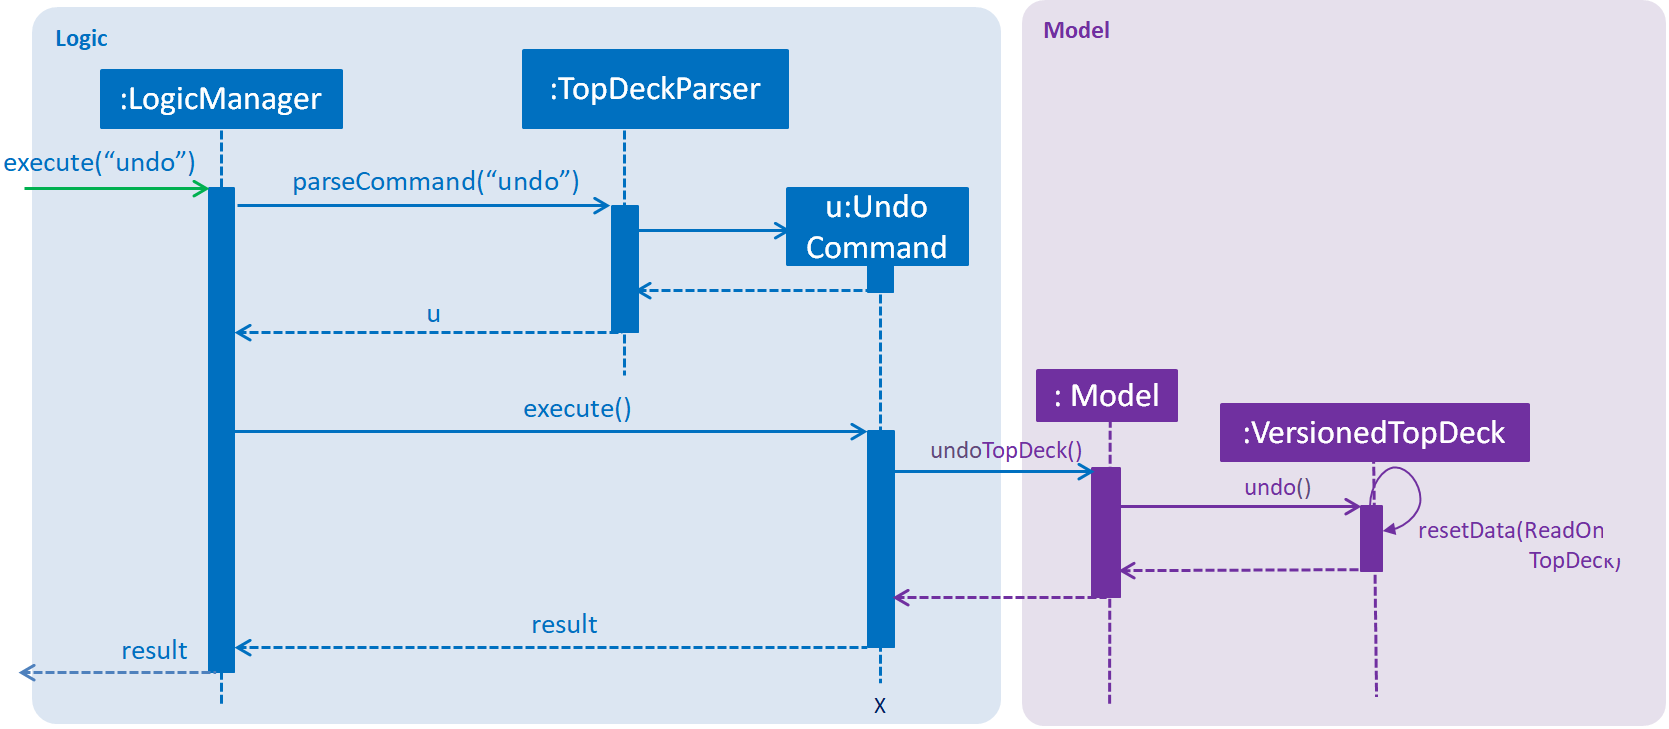
command. The undo command will call Model#undoTopDeck(), which will shift the currentStatePointer once to the left, pointing it to the previous TopDeck state, and restores TopDeck to that state.
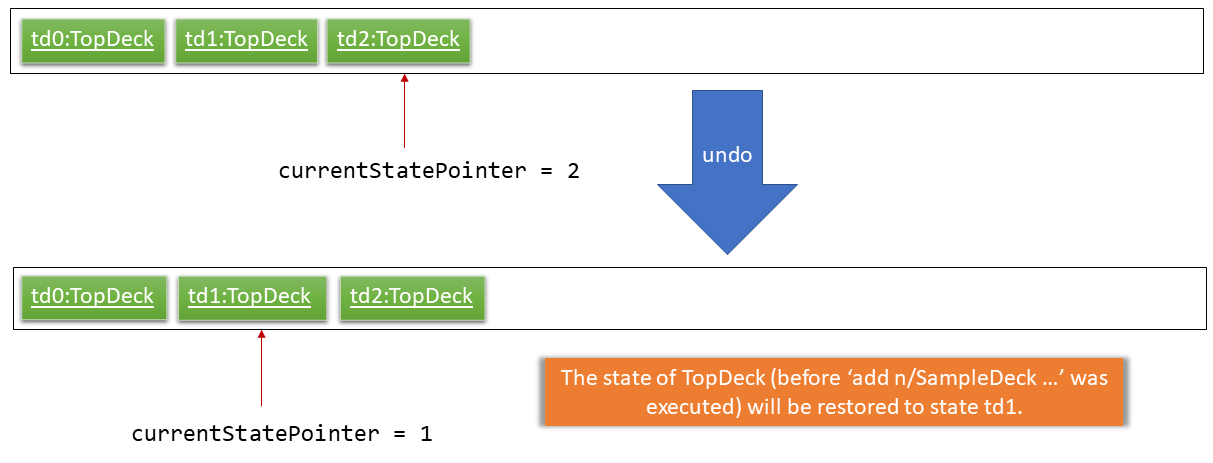
If the currentStatePointer is at index 0, pointing to the initial TopDeck state, then there are no previous TopDeck states to restore. The undo command uses Model#canUndoTopDeck() to check if this is the case. If so, it will return an error to the user rather than attempting to perform the undo.
|
The following sequence diagram shows how the undo operation works:
The redo command does the opposite — it calls Model#redoTopDeck(), which shifts the currentStatePointer once to the right, pointing to the previously undone state, and restores TopDeck to that state.
If the currentStatePointer is at index topDeckStateList.size() - 1, pointing to the latest TopDeck state, then there are no undone TopDeck states to restore. The redo command uses Model#canRedoTopDeck() to check if this is the case. If so, it will return an error to the user rather than attempting to perform the redo.
|
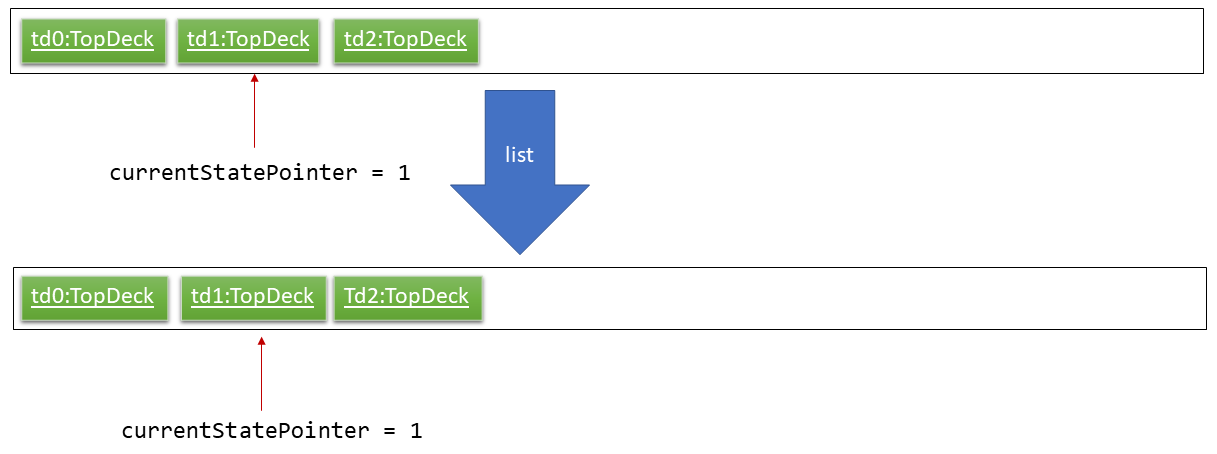
Step 5. The user then decides to execute the command list. Commands that do not modify TopDeck, such as list, will usually not call Model#commitTopDeck(), Model#undoTopDeck() or Model#redoTopDeck(). Thus, the topDeckStateList remains unchanged.
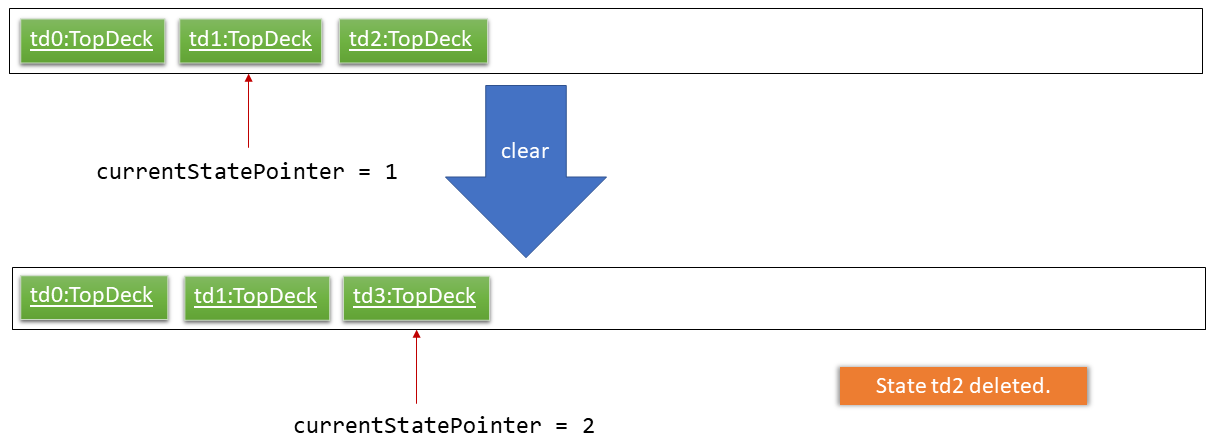
Step 6. The user executes clear, which calls Model#commitTopDeck(). Since the currentStatePointer is not pointing at the end of the topDeckStateList, all TopDeck states after the currentStatePointer will be purged. We designed it this way because it no longer makes sense to redo the add n/David … command. This is the behavior that most modern desktop applications follow.
The following activity diagram summarizes what happens when a user executes a new command:

4.5.2. Design Considerations
Aspect: How undo & redo executes
-
Alternative 1 (current choice): Saves all TopDeck data.
-
Pros: Easy to implement.
-
Cons: May have performance issues in terms of memory usage.
-
-
Alternative 2: Individual command knows how to undo/redo by itself.
-
Pros: Will use less memory (e.g. for
delete, just save the deck being deleted). -
Cons: We must ensure that the implementation of each individual command are correct.
-
Aspect: Data structure to support the undo/redo commands
-
Alternative 1 (current choice): Use a list to store the history of TopDeck states.
-
Pros: Easy for new Computer Science student undergraduates to understand, who are likely to be the new incoming developers of our project.
-
Cons: Logic is duplicated twice. For example, when a new command is executed, we must remember to update both
HistoryManagerandVersionedTopDeck.
-
-
Alternative 2: Use
HistoryManagerfor undo/redo-
Pros: We do not need to maintain a separate list, and just reuse what is already in the codebase.
-
Cons: Requires dealing with commands that have already been undone: We must remember to skip these commands. Violates Single Responsibility Principle and Separation of Concerns as
HistoryManagernow needs to do two different things.
-
4.6. Logging
We are using java.util.logging package for logging. The LogsCenter class is used to manage the logging levels and logging destinations.
-
The logging level can be controlled using the
logLevelsetting in the configuration file (See Section 4.7, “Configuration”) -
The
Loggerfor a class can be obtained usingLogsCenter.getLogger(Class)which will log messages according to the specified logging level -
Currently log messages are output through:
Consoleand to a.logfile.
Logging Levels
-
SEVERE: Critical problem detected which may possibly cause the termination of the application -
WARNING: Can continue, but with caution -
INFO: Information showing the noteworthy actions by the App -
FINE: Details that is not usually noteworthy but may be useful in debugging e.g. print the actual list instead of just its size
4.7. Configuration
Certain properties of the application can be controlled (e.g user prefs file location, logging level) through the configuration file (default: config.json).
5. Documentation
We use asciidoc for writing documentation.
| We chose asciidoc over Markdown because asciidoc, although a bit more complex than Markdown, provides more flexibility in formatting. |
5.1. Editing documentation
See UsingGradle.adoc to learn how to render .adoc files locally to preview the end result of your edits.
Alternatively, you can download the AsciiDoc plugin for IntelliJ, which allows you to preview the changes you have made to your .adoc files in real-time.
5.2. Publishing documentation
See UsingTravis.adoc to learn how to deploy GitHub Pages using Travis.
5.3. Converting documentation to PDF format
We use Google Chrome for converting documentation to PDF format, as Chrome’s PDF engine preserves hyperlinks used in webpages.
Here are the steps to convert the project documentation files to PDF format.
-
Follow the instructions in UsingGradle.adoc to convert the AsciiDoc files in the
docs/directory to HTML format. -
Go to your generated HTML files in the
build/docsfolder, right click on them and selectOpen with→Google Chrome. -
Within Chrome, click on the
Printoption in Chrome’s menu. -
Set the destination to
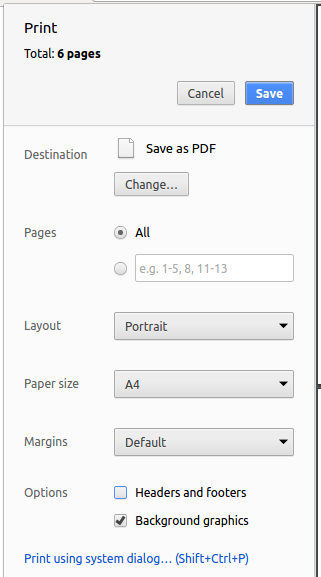
Save as PDF, then clickSaveto save a copy of the file in PDF format. For best results, use the settings indicated in the screenshot below.
5.4. Site-wide documentation settings
The build.gradle file specifies some project-specific asciidoc attributes which affects how all documentation files within this project are rendered.
Attributes left unset in the build.gradle file will use their default value, if any.
|
| Attribute name | Description | Default value |
|---|---|---|
|
The name of the website. If set, the name will be displayed near the top of the page. |
not set |
|
URL to the site’s repository on GitHub. Setting this will add a "View on GitHub" link in the navigation bar. |
not set |
|
Define this attribute if the project is an official SE-EDU project. This will render the SE-EDU navigation bar at the top of the page, and add some SE-EDU-specific navigation items. |
not set |
5.5. Per-file documentation settings
Each .adoc file may also specify some file-specific asciidoc attributes which affects how the file is rendered.
Asciidoctor’s built-in attributes may be specified and used as well.
Attributes left unset in .adoc files will use their default value, if any.
|
| Attribute name | Description | Default value |
|---|---|---|
|
Site section that the document belongs to.
This will cause the associated item in the navigation bar to be highlighted.
One of: * Official SE-EDU projects only |
not set |
|
Set this attribute to remove the site navigation bar. |
not set |
5.6. Site template
The files in docs/stylesheets are the CSS stylesheets of the site.
You can modify them to change some properties of the site’s design.
The files in docs/templates controls the rendering of .adoc files into HTML5.
These template files are written in a mixture of Ruby and Slim.
|
Modifying the template files in |
6. Testing
6.1. Running tests
There are three ways to run tests.
| The most reliable way to run tests is the 3rd one. The first two methods might fail some GUI tests due to platform/resolution-specific idiosyncrasies. |
Method 1: Using IntelliJ JUnit test runner
-
To run all tests, right-click on the
src/test/javafolder and chooseRun 'All Tests' -
To run a subset of tests, you can right-click on a test package, test class, or a test and choose
Run 'ABC'
Method 2: Using Gradle
-
Open a console and run the command
gradlew clean allTests(Mac/Linux:./gradlew clean allTests)
| See UsingGradle.adoc for more info on how to run tests using Gradle. |
Method 3: Using Gradle (headless)
Thanks to the TestFX library we use, our GUI tests can be run in the headless mode. In the headless mode, GUI tests do not show up on the screen. That means the developer can do other things on the Computer while the tests are running.
To run tests in headless mode, open a console and run the command gradlew clean headless allTests (Mac/Linux: ./gradlew clean headless allTests)
6.2. Types of tests
We have two types of tests:
-
GUI Tests - These are tests involving the GUI. They include,
-
System Tests that test the entire App by simulating user actions on the GUI. These are in the
systemtestspackage. -
Unit tests that test the individual components. These are in
seedu.address.uipackage.
-
-
Non-GUI Tests - These are tests not involving the GUI. They include,
-
Unit tests targeting the lowest level methods/classes.
e.g.seedu.address.commons.StringUtilTest -
Integration tests that are checking the integration of multiple code units (those code units are assumed to be working).
e.g.seedu.address.storage.StorageManagerTest -
Hybrids of unit and integration tests. These test are checking multiple code units as well as how the are connected together.
e.g.seedu.address.logic.LogicManagerTest
-
6.3. Troubleshooting testing
Problem: HelpWindowTest fails with a NullPointerException.
-
Reason: One of its dependencies,
HelpWindow.htmlinsrc/main/resources/docsis missing. -
Solution: Execute Gradle task
processResources.
7. Dev Ops
7.1. Build automation
See UsingGradle.adoc to learn how to use Gradle for build automation.
7.2. Continuous integration
We use Travis CI and AppVeyor to perform Continuous Integration on our projects. See UsingTravis.adoc and UsingAppVeyor.adoc for more details.
7.3. Coverage reporting
We use Coveralls to track the code coverage of our projects. See UsingCoveralls.adoc for more details.
7.4. Documentation previews
When a pull request has changes to asciidoc files, you can use Netlify to see a preview of how the HTML version of those asciidoc files will look like when the pull request is merged. See UsingNetlify.adoc for more details.
7.5. Making a release
Here are the steps to create a new release.
-
Update the version number in
MainApp.java. -
Generate a JAR file using Gradle.
-
Tag the repo with the version number. e.g.
v0.1 -
Create a new release using GitHub and upload the JAR file you created.
7.6. Managing dependencies
A project often depends on third-party libraries. For example, TopDeck depends on the Jackson library for JSON parsing. Managing these dependencies can be automated using Gradle. For example, Gradle can download the dependencies automatically, which is better than these alternatives:
-
Include those libraries in the repo (this bloats the repo size)
-
Require developers to download those libraries manually (this creates extra work for developers)
Appendix A: Product scope
Target user profile:
-
has a need to manage a significant number of contacts
-
prefer desktop apps over other types
-
can type fast
-
prefers typing over mouse input
-
is reasonably comfortable using CLI apps
Value proposition: manage contacts faster than a typical mouse/GUI driven app
Appendix B: User stories
Priorities: High (must have) - * * *, Medium (nice to have) - * *, Low (unlikely to have) - *
| Priority | As a … | I want to … | So that I can… |
|---|---|---|---|
|
new user |
see usage instructions |
refer to instructions when I forget how to use the App |
|
user |
add a new deck |
|
|
user |
delete a deck |
remove entries that I no longer need |
|
user |
find a deck by name |
locate details of decks without having to go through the entire list |
|
user |
hide private contact details by default |
minimize chance of someone else seeing them by accident |
|
user with many decks in TopDeck |
sort decks by name |
locate a deck easily |
{More to be added}
Appendix C: Use cases
(For all use cases below, the System is TopDeck and the Actor is the user, unless specified otherwise)
Use case: Delete deck
MSS
-
User requests to list decks
-
TopDeck shows a list of decks
-
User requests to delete a specific deck in the list
-
TopDeck deletes the deck
Use case ends.
Extensions
-
2a. The list is empty.
Use case ends.
-
3a. The given index is invalid.
-
3a1. TopDeck shows an error message.
Use case resumes at step 2.
-
{More to be added}
Appendix D: Non functional requirements
-
Should work on any mainstream OS as long as it has Java
9or higher installed. -
Should be able to hold up to 1000 decks without a noticeable sluggishness in performance for typical usage.
-
A user with above average typing speed for regular English text (i.e. not code, not system admin commands) should be able to accomplish most of the tasks faster using commands than using the mouse.
{More to be added}
Appendix F: Product survey
Product Name
Author: …
Pros:
-
…
-
…
Cons:
-
…
-
…
Appendix G: Instructions for manual testing
Given below are instructions to test the app manually.
| These instructions only provide a starting point for testers to work on; testers are expected to do more exploratory testing. |
G.1. Launch and shutdown
-
Initial launch
-
Download the jar file and copy into an empty folder
-
Double-click the jar file
Expected: Shows the GUI with a set of sample contacts. The window size may not be optimum.
-
-
Saving window preferences
-
Resize the window to an optimum size. Move the window to a different location. Close the window.
-
Re-launch the app by double-clicking the jar file.
Expected: The most recent window size and location is retained.
-
{ more test cases … }
G.2. Deleting a deck
-
Deleting a deck while all decks are listed
-
Prerequisites: List all decks using the
listcommand. Multiple decks in the list. -
Test case:
delete 1
Expected: First deck is deleted from the list. Details of the deleted deck shown in the status message. Timestamp in the status bar is updated. -
Test case:
delete 0
Expected: No deck is deleted. Error details shown in the status message. Status bar remains the same. -
Other incorrect delete commands to try:
delete,delete x(where x is larger than the list size) {give more}
Expected: Similar to previous.
-
{ more test cases … }
G.3. Saving data
-
Dealing with missing/corrupted data files
-
{explain how to simulate a missing/corrupted file and the expected behavior}
-
{ more test cases … }